DIY & Home Improvement
Related: About this forumShortening a metal pipe...
The downstairs bathroom was retiled, and now the pedestal sink doesn't go back together at the right height. I'm trying to avoid paying a plumber... I KNOW I CAN DO THIS!
Any ideas on what can be used to shorten a piece that looks like this? I'm guessing around 1/16". A file? Some sort of blade? It's the thing on the right that needs to be shortened just a smidge.
$*%@#$ plumbing! 
 = new reply since forum marked as read
Highlight:
NoneDon't highlight anything
5 newestHighlight 5 most recent replies
= new reply since forum marked as read
Highlight:
NoneDon't highlight anything
5 newestHighlight 5 most recent replies

mbperrin
(7,672 posts)Definitely don't get a plumber. This is much too simple for that.

WorseBeforeBetter
(11,441 posts)I figured it's simple, that's why I'm determined! And thanks for the quick reply -- I gotta pay more attention to this group.

JoeyT
(6,785 posts)Cheap angle grinder can be bought for 20ish bucks, the blade is around 2 dollars.
I'd cut a piece of scrap a few times first to make sure you know how hard to push, then whack it off. Make sure you wear safety glasses, too.
WorseBeforeBetter
(11,441 posts)I'll be hitting Home Depot tomorrow -- at least I'll have an idea of where to start/ask questions!

jeff47
(26,549 posts)WorseBeforeBetter
(11,441 posts)But I just came home from Home Depot and I may leave that drain pipe intact. It's part of an expensive faucet set and I'm now thinking maybe I shouldn't cut that particular piece. Rather, I'd replace the 2 pieces between the wall pipe and the faucet drain pipe. Metal to plastic...they told me it was OK. And it would be much easier to cut plastic than metal. They also told me I don't need that purple stuff for where pieces join together. Or thread tape.
(Getting *this* close to calling a plumber.  )
)

X_Digger
(18,585 posts)The fittings under the sink are best done with slip fittings and nuts. You slide a plastic nut, then a plastic washer (cone side down) over the tailpipe, then slip the trap over the tailpiece and hand tighten the nut.
They make an adjustable ribbed piece that can accommodate various angles. It looks like a bendy straw.
WorseBeforeBetter
(11,441 posts)I just didn't know the name of it. But I tried unscrewing it and it's not budging and am wondering if the plumber used some sort of cement (?) to really anchor it. I do have one of those plumbing wrenches so I'll see if I can get it to budge with that.
There's too big of a gap between the brown thing and the sink. I know I need plumber's putty, but that's too big of a gap. I just can't quite wrap my head around what piece(s) need lowered and/or raised to get it flush!

X_Digger
(18,585 posts)A hacksaw or a sawzall with a metal cutting blade would let you cut an inch off the tailpipe. As long as you go slow and don't push on it, you'll be fine.
Since the trap uses a slip fitting to go over the tailpipe, it doesn't matter if the cut is perfectly straight. One tip though, if you do use something like a saw to cut the tailpipe, use a round file to get rid of the burs on the cut- that's a great place for things to snag and collect, otherwise.
WorseBeforeBetter
(11,441 posts)and I do have various files, along with the hacksaws.

catnhatnh
(8,976 posts)...clamp a piece of a wooden dowel as close to the diameter of the pipe as possible in a vise or to a workbench. Slip the end of the pipe over the dowel and use any cutting tool to cut away the waste section. This will support the pipe wall and allow you to make the entire cut from the top by rotating the pipe.
WorseBeforeBetter
(11,441 posts)I didn't think about distortion.
Thanks.
WorseBeforeBetter
(11,441 posts)OK, here's the back of the sink, with four holes:

It was handyman-installed years ago without bolts or brackets -- it was just set on the base and siliconed to the wall. I've decided to do it right. Or attempt to do it right.
I'm Googling like mad, and believe I may have to do something like this:
Or use drywall anchors? Drywall anchors don't seem as sturdy (this sucker is heavy)...what do you think?
Next dumb question: It looks like I can reach only the two center holes on the back of the sink with my hand or a wrench. Are the two outer holes just to "lay" the sink on some sort of a bolt for additional support? Something that may look like this?

Thanks for any help...I'm determined to do this!
X_Digger
(18,585 posts)And if there isn't a cleat, I'd install one.
I'd expect some kid (or teen) to hang off the front edge of the sink, hehe.
As to the mounting holes for wall mounts.. two are usually meant to go on a bracket / hanger, and two are lag bolted to the cleat.
First step would be to clean off as much of the old adhesive as you can manage. If you don't have the hanger, you should be able to get by with glue + lag bolts into the cleat. (Not a perfect solution, mind you.) Be careful tightening down the lag bolts if the sink is ceramic, not cast iron.
WorseBeforeBetter
(11,441 posts)cutting into the drywall and using the existing framework if possible, and if not, creating cleats?
The sink didn't come with any sort of bracket/hangar, and the Kohler instructions say to:
http://www.ehow.com/how_4963076_install-kohler-pedestal-sinks.html
And lag bolts are these?:

Yeah, I'm amazed the original install lasted as long as it did. It was level, didn't wobble, didn't leak... but I guess it was a disaster waiting to happen. I just looked at the back of the sink again. There is no way I can reach the 2 outer holes to screw anything (unless I'm missing something), so it'll be the 2 center holes + glue!
X_Digger
(18,585 posts)If you're lucky, the sink location spans two studs, so you only have to cut one pocket for it.
Worst case scenario is that there's a stud right in the middle of where the sink goes, so you have to open up 16" (or 24" to the left AND right.
Is this a pedestal sink, or a wall-mount? I think I just assumed it was wall-mount. If it's a pedestal, you could probably get by with just some toggle bolts.
And yup, those are lag bolts.
*eta: Yup, I'm an idiot.. you said pedestal, and I totally missed it looking at the picture, hehe.
WorseBeforeBetter
(11,441 posts)No, you're quite helpful! But just in case, this is exactly it:

I haven't gotten out the stud finder yet. That'll be my 4th of July surprise.
WorseBeforeBetter
(11,441 posts)With no cutting drywall/cleat creation? I kinda like that idea. Two toggle bolts, tons of adhesive, and resting on the base. Hmm. I'll sleep on it.
X_Digger
(18,585 posts)You really only want to keep it from moving side to side.
Now, if you were to trip on the bath mat and fall against it, it might come out of the wall, but a kid swinging from it, or a teen leaning on the front edge to check for pimples isn't going to move it.
WorseBeforeBetter
(11,441 posts)If any of that happens, my pedestal days are over... forever.
One of the Home Depot associates told me that the bowl doesn't even need to touch the base. I think I gave him a WTF look, smiled and walked away. Then there's my (former) handyman who rested it solely on the base. I'll find that happy medium...
X_Digger
(18,585 posts)But as you say, a happy medium is a good place to be.
WorseBeforeBetter
(11,441 posts)And I'm enjoying this much more than Snowden/Zimmerman/ObamaCare(s)/etc.!
X_Digger
(18,585 posts)Can't be beat.
WorseBeforeBetter
(11,441 posts)but I'm getting it straight in my head, and will love those tangible results! It might take me a week, but I'll get it...
X_Digger
(18,585 posts)WorseBeforeBetter
(11,441 posts)WorseBeforeBetter
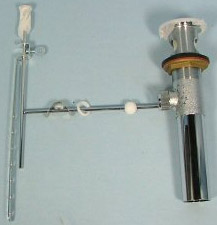
(11,441 posts)I'm not sure what it's called, but it's this:

that needs to fit into this:

with this screwed to it from the top:
Am I correct in understanding that the only thing stopping a gush of water is that black rubbery gasket? The original one appears a bit worn and should probably be replaced. The ridge/bump doesn't fit snugly INSIDE the drain opening and the faucet instructions clearly say "inside." Is there a better part to use? Once I get that all together, should I plumber putty the hell out of that area -- gasket, washer, lock nut?
(I have a friend helping me on Friday and I'm trying to make sure I have everything I need... thanks for any advice! Other than hire a plumber... ha, ha.)
X_Digger
(18,585 posts)Should be a lever with attached nut that screws onto the tailpiece, and the short end of that lever rides in a socket in the plug to close off the sink. Should be a chrome / nickel / brass piece that screws into the tailpiece from the top. That black piece looks like the piece that rides under the chrome / nickel / brass ring.
eta: Sorry, missed your text below the last pic..
What holds the water from gushing out is the chrome / nickel / brass piece, then black piece, then plumber's putty, plus the rubber gasket and nut that screws on to the tailpiece from the bottom.
WorseBeforeBetter
(11,441 posts)What I have are:
Black rubbery piece, white plastic ring, and brass nut thingie:

You think I may be missing some sort of ring that goes on top of the black thing? I'll call the faucet company, or head to Home Depot and rip open a similar box (!) to check.
The instructions look like this (sorry, fuzzy), and I do have the stopper and all that accessory stuff. I know it goes back together; I'm just not quite "getting" the area near the hole and the black thing.

X_Digger
(18,585 posts)Let me google a good diagram..

The black piece appears to be the gasket, which goes below the sink, and above the nut.
I didn't see a flange in your assembly, but it appears to be in the diagram (along with the pop-up).
WorseBeforeBetter
(11,441 posts)I know how to install the pop-up, so I'm good there. (Hot damn, I now know what a "Clevis Strap" is.) This is the flange, isn't it?
It's threaded and screws into the INSIDE of the tailpiece in the actual bowl. I'll do like this:

So based on the diagram, should I do black gasket/white plastic ring/jamb nut with a ring of plumber's putty around the 3 pieces? Or is the putty layered somehow? I think I definitely need a new black gasket since mine is sort of squished. Random Google... this one looks good, mine has seen better days:

X_Digger
(18,585 posts)If the pop-up is also black, then that'd make sense. Some kind of hammered copper finish?
The black gasket goes against the bowl of the sink on the bottom, then the white washer, then the nut. On the inside of the sink, you have flange and plumber's putty.
Work the plumber's putty in your hands to warm it up, you want it like kids play clay. As you tighten down the nut on the bottom, the putty will start squeezing out around the flange- that's normal. You want just a razor width of distance between the flange and the bowl. When it's tight, pull out the excess putty and put it back in the can. Run a wet finger along the flange edge to smooth out any remaining putty.
WorseBeforeBetter
(11,441 posts)OK, this is making *total* sense now. And I'm really precise with caulking, so I imagine I can handle the putty. 
X_Digger
(18,585 posts)TheMadMonk
(6,187 posts)...the base of the pedestal with a bit of something rot-proof and use a mold resistant silicone to hide the gap.
Strikes me that if you haven't already cut into the wall this is the simplest and cheapest method.
Also drywall anchors with a generous helping of glue should be more than sufficient. You'd be surprised at just how much weight drywall can support.
A trick that's useful to know when working with silicone is that it won't stick to soap, oil or grease, letting you paint your masking into very complex curves if necessary. However, you need to use an ice-cream stick (or similar hard edged, round ended device) to smooth it into place. A finger may remove your mask letting the silicone stick where you don't want it. Obviously, unlike with paper masking, you need to let the silicone harden before cleanup.
WorseBeforeBetter
(11,441 posts)into the wall:

There isn't much room to work with as far as fancy cleating, since the drain pipe (or whatever it's called) is almost flush with the drywall. The plan of attack is to mount a piece of lumber, looks about 5/8" thick. Can I buy lumber that depth? I dunno. If not, I'll buy the closest I can find and use joint compound to make the wall smooth. THANKFULLY, the two mounting holes on the backside of the sink are about 4" from the center/wall pipe and will go right into the wood I put up. So, it'll be up with 2 lag bolts (?), some adhesive, and resting on the base.
I think I can handle this. And I'm good with joint compound/sanding so the finished product will look nice. If not, I can always slap up a tile backsplash -- so much gorgeous tile out there!
WorseBeforeBetter
(11,441 posts)
It seems sturdy, it doesn't leak, and...

That was BY FAR the biggest PITA project I've ever worked on, but I'm thrilled that it's up and running. Thanks to everyone for your help!
X_Digger
(18,585 posts)WorseBeforeBetter
(11,441 posts)No more projects for a while!
X_Digger
(18,585 posts)Of course, if you're anything like my wife and me, any time anyone comes over (friend, delivery guy, jehova's witness..) you'll want to show it off.
(That's one way to make a JW leave.. out talk them.)
WorseBeforeBetter
(11,441 posts)I'm half-tempted to post an audio clip of the water running (and NOT gushing on the floor), but I figure that'd be a bit much.